SVG
2021. 12. 6. 14:45ㆍSTUDY/JavaScript

SVG(Scalable Vector Grapics)
SVG(Scalable Vector Graphics)는 2차원 벡터 그래픽을 서술하는 XML 기반의 마크업 언어입니다. SVG는 텍스트 기반의 열린 웹 표준 중 하나로, 모든 사이즈에서 깔끔하게 렌더링 되는 이미지를 서술하며 CSS, DOM, JavaScript, SMIL, (en-US) 등 다른 웹 표준과도 잘 작동하도록 설계됐습니다. SVG는 달리 말하자면 HTML과 텍스트의 관계를 그래픽에 적용한 것입니다.
HTML5 에서 SVG
- HTML5 에서 SVG와 Canvas
- HTML5에서 가장 눈에 띄는 변화는 강력해진 멀티미디어 지원
- HTML5에서는 그래픽을 그릴 수 있는 2개의 기술이 있다.
- SVG는 새로운 기술은 아니고, HTML과 별개로 존재하던 기술을 HTML5 포함 시킨것이다.
SVG는 벡터방식
Scalable Vector Graphic
*XML 기반의 표준 벡터 그래픽 포멧
*인터렉티브하고 애니메이션이 가능
*CSS로 SVG를 스타일링 할 수 있고, SVG COM을 이용하여 동적인 비헤이비어 추가가능 <object>태그를 이용하여 표준 xhtml안에 추가
*이미지를 구성하는 기본 도형을 마크업으로 나타낸다.
*해상도에 관계없이 깔끔한 이미지
*이미지 구성요소들의 추가, 삭제, 이동, 축소, 확대 등이 자유롭다.
*애니메이션을 좀 더 쉽게 사용할 수 있다.
*현재 플래시를 대처하기에 알맞음. (메뉴, 동적 그래프, 애니메이션)
Canvas는 비트맵방식 (bitmap, raster)
*이미지를 픽셀단위로 처리, 이를 위한 자바스크립트 API가 존재
*벡터 처리방식에 비해 보다 복잡한 그래픽을 더 빠른 속도로 처리할 수 있다.
*3D를 위한 API도 있으며 따로 떨어져 WebGL이 됨
그래프 객체
*다양한 자바스크립트로 드로잉 API들을 제공
*실제로 드로잉 하기 위해 다음 옵션을 사용
- 2D 드로잉 컨텍스트
- 3D 드로잉 컨텍스트 (WEbGL)
*빠르게 드로잉 연산 수행.
*파일 포멧이 아니라 단지 스크립트를 이용하는 것
*SVG는 기본 데이터 파일 구조가 xml 형태로 저장된다.
*그래서 그래픽 요소들 즉 선, 원, 사각형들을 하나하나의 객체로 자바스크립트에서 접근하여 조작할 수 있다.
*그러나 Canvas는 하나의 비트맵상에서 컨텍스트를 얻어와 그림을 그린다. 비트맵 전체를 하나의 객체로 접근해야 한다.
*마치 svg는 cad, word나 파워포인트에서 그림을 그리는 것과 같고 Canvas는 그림판에 그림을 그리는 것과 같다.
데이터와 소스의 분리
*SVG는 데이터만 XML파일에 저장되어 있기 때문에 데이터만 전달해도 된다.
*Canvas는 자바스크립트로 그림을 그리기 때문에 소스코드도 함께 전달해야 한다.
SVG 사용방법
<svg></svg>
- 원이나 타원뿐 아니라 모든 그래픽 표현가능 (원,다각형)
- 특수효과 알파값
- 회전 위치조정등의 트랜스포메이션
- 애니메이션
- 그라디언트
- 자바스크립트로 그래픽을 접근하여 수정가능
사각형 Rectangle
<style>
*{margin: 30px; padding: 0;}
#exampleSub.bg{background:url(./img/line.jpg) 0 0 repeat;}
#exampleSub svg{width: 1000px; height: 250px;}
</style>

<div id="exampleSub">
    <svg>
        <rect width="100" height="100" />
        <rect x="100" y="100" width="100" height="100" rx="50" ry="20" />
    </svg>
</div>
SVG 요소의 스타일 지정
| fill | 채움 색상 |
| stroke | 선 색상 |
| stroke-width | 선 두께 |
| opacity | 투명도 |
<style>
#cssControl{fill:#f00; stroke:rgb(0,0,255); stroke-width:10; opacity:0.4;}
</style>

<div id="exampleSub" class="bg">
    <svg>
        <rect x="10" width="90" height="90" style="fill:#00f" />
        <rect x="110" y="0" width="90" height="90" style="opacity:0.3" />
        <rect x="10" y="100" width="90" height="90" style="stroke-width:10;stroke:rgba(255,0,0,0.5)" /> <!-- 안,밖 반반-->
        <rect id="cssControl" x="110" y="100" width="90" height="90" />
    </svg>
</div>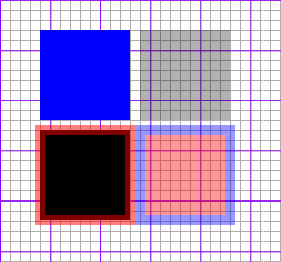
원형
<circle cx="[cx]" cy="[cy]" r="[r]" />
원을 생성함
속성
cx : 원 중심점의 X좌표
cy : 원 중심점의 Y좌표
r : 원의 반지름

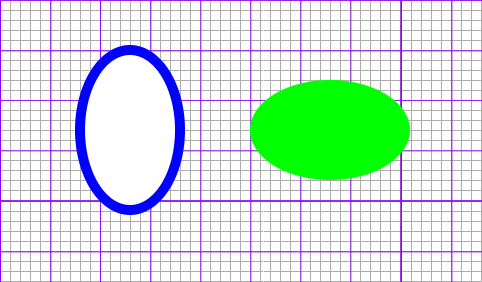
타원형
타원을 작성
속성
cx : 타원 중점의 X좌표
cy : 타원 중점의 Y좌표
rx : 타원의 횡축 반지름
ry : 타원의 종축 반지름
<style>
*{margin: 30px; padding: 0;}
#exampleSub.bg{background:url(./img/line.jpg) 0 0 repeat;}
#exampleSub svg{width: 1000px; height: 250px;}

#cssControl{fill:#f00; stroke:rgb(0,0,255); stroke-width:10; opacity:0.4;}
#ellipse01{fill:#fff; stroke:rgb(0,0,255); stroke-width:10;}
#ellipse02{fill:#0f0;}
</style>

<div id="exampleSub" class="bg">
    <svg>
        <ellipse id="ellipse01" cx="100" cy="100" rx="50" ry="80" />
        <ellipse id="ellipse02" cx="300" cy="100" rx="80" ry="50" />
    </svg>
</div>
*라인
<line x1="[x1]" y1="[y1]" x2="[x2]" y2="[y2]" />
직선의 작성
속성
x1 : 직선 시점의 X좌표
y1 : 직선 시점의 y좌표
x2 : 직선 종점의 X좌표
y2 : 직선 종점의 y좌표
<style>
*{margin: 30px; padding: 0;}
#exampleSub.bg{background:url(./img/line.jpg) 0 0 repeat;}
#exampleSub svg{width: 1000px; height: 250px;}

.lineClass{stroke:#00f; stroke-width:15;}
#lineId{stroke:#f00; stroke-width:15;}

</style>

<div id="exampleSub" class="bg">
    <svg>
        <line class="lineClass" x1="0" y1="0" x2="100" y2="100" />
        <line class="lineClass" x1="100" y1="100" x2="200" y2="100" />
        <line id="lineId" x1="200" y1="100" x2="200" y2="50" />
        <line class="lineClass" x1="200" y1="50" x2="100" y2="200" />
    </svg>
</div>

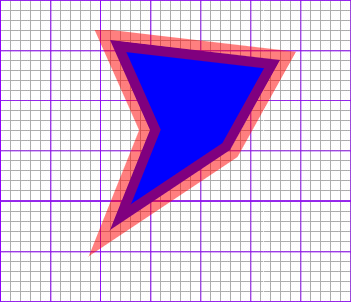
*다각형
<polygon points="[code] [code] [code]..." />
다각형의 작성
속성
code : 다각형을 구성하는 x,y좌표 공란으로 구분함
<style>
*{margin: 30px; padding: 0;}
#exampleSub.bg{background:url(./img/line.jpg) 0 0 repeat;}
#exampleSub svg{width: 1000px; height: 250px;}

#polygonSample{fill:#00f; stroke:rgba(255,0,0,0.5); stroke-width:20;}
</style>

<div id="exampleSub" class="bg">
    <svg>
        <polygon id="polygonSample"
        points="80,10
            250,30
            200,120
            80,200
            120,100" />
    </svg>
</div>
*polyline
<polyline points="[code] [code] [code]..." />
폴리라인의 작성
속성
code : 폴리라인을 구성하는 x,y좌표 공란으로 구분함
<style>
*{margin: 30px; padding: 0;}
#exampleSub.bg{background:url(./img/line.jpg) 0 0 repeat;}
#exampleSub svg{width: 1000px; height: 250px;}

#polylineSample{fill:rgba(255,0,0,0.5); stroke:#00f; stroke-width:20;}
</style>

<div id="exampleSub" class="bg">
    <svg>
        <polyline id="polylineSample"
                points="80,10
                        250,30
                        200,120
                        80,200
                        120,100" />
    </svg>
</div>
*path
<path d="[path Code]" />
복잡한 선의 작성
[path Code]
M[x][y] : 작도 시점 이동:이동할 X,Y좌표
L[x][y] : 직선 그리기:선을 그릴 X,Y좌표
H[x] : 수평선 그리기:수평선을 그릴 X좌표
V[y] : 수직선 그리기:수직선을 그릴 Y좌표
C[c1x] [c1y] [c2x] [c2y] [x] [y] : 커브 그리기:조절점1의 X,Y좌표 조절점2의 X,Y좌표 커브종점의 X,Y좌표
S[c1x] [c1y] [x] [y] : 단순 커브 그리기:조절점 X,Y 커브종점의 X,Y좌표
Q[c1x] [c1y] [x] [y] : 2차 베지어곡선:조절점 X,Y 곡선종점의 X,Y좌표
T[x] [y] : 베지어곡선:곡선종점의 X,Y좌표
A[rx] [ry] [degx] [func] [direc] [x] [y] : 타원 호:X방향 지름, Y방향 지름, X축에 대한 경사도, 호 생성방법, 회전방향, 호끝점의 X,Y좌표
Z : pass 닫기
<style>
*{margin: 30px; padding: 0;}
#exampleSub.bg{background:url(./img/line.jpg) 0 0 repeat;}
#exampleSub svg{width: 1000px; height: 250px;}

#passSample{fill:#FFF; stroke:#0f0; stroke-width:10;}
</style>

<div id="exampleSub" class="bg">
    <svg>
        <path id="passSample"
            d="M50 50
                L150 150
                H250
                V50
                Q350 150 350 70
                T200 30
                C250 100 200 200 100 150
                S150 180 150 50
                Z"
         />
    </svg>
</div>
*text/tspan
<text x="[x]" y="[y]">[문자열]</text>
문자의 작성
속성
x : 문자열 위치의 X좌표
y : 문자열 위치의 Y좌표
<tspan dx["dx"] dy="[dy]">[문자열]</tspan>
문자열 그룹의 작성
속성
x : 문자열 위치의 X좌표
y : 문자열 위치의 Y좌표
dx : 원래 문자열 위치에서 변경할 X좌표 거리
dy : 원래 문자열 위치에서 변경할 Y좌표 거리
<style>
*{margin: 30px; padding: 0;}
#exampleSub.bg{background:url(./img/line.jpg) 0 0 repeat;}
#exampleSub svg{width: 1000px; height: 250px;}

#coForward{fill:#0099D8; font-size:40px; font-style:normal; font-weight:bold; font-family:Trebuchet MS, Arial, Helvetica, sans-serif;}
#coForward tspan{fill:#0850A0;	font-variant:small-caps;}
#nscreen{font-size:25px; font-family:Trebuchet MS, Arial, Helvetica, sans-serif; font-weight:bold; fill:transparent; stroke:#096; stroke-width:2;}
</style>

<div id="exampleSub" class="bg">
    <svg>
        <text id="textSample" x="60" y="100">
            <tspan id="coForward">co<tspan>Forward</tspan></tspan>
            <tspan id="nscreen" dx="-150" dy="25">Web on The N Screen</tspan>
        </text>
    </svg>
</div>
*textPath
<textPath xlink:href="[#패스 아이디]">[문자열]<textPath/>
문자열이 흐를 패스를 지정
속성
#패스 아이디 : 패스로 지정한 요소의 ID
<defs />
SVG 요소를 정의 화면에는 표시되지 않음
<style>
*{margin: 30px; padding: 0;}
#exampleSub.bg{background:url(./img/line.jpg) 0 0 repeat;}
#exampleSub svg{width: 1000px; height: 250px;}

#nscreen{font-size:20px; font-family:Trebuchet MS, Arial, Helvetica, sans-serif; font-weight:bold; fill:transparent; stroke:#096; stroke-width:1; text-align:center;}
</style>

<div id="exampleSub" class="bg">
    <svg>
        <defs>
            <path id="textPath"
                d="M80 150
                    A10 10 0 0 1 250 150"/>
        </defs>
        <text id="nscreen">
            <textPath xlink:href="#textPath" >
                coForward : Web on The N Screen
            </textPath>
        </text>
    </svg>
</div>
*image
<image x="[x]" y="[y]" width="[width]" height="[height]" xlink:href="이미지 경로" />
SVG내로 이미지를 삽입함
속성
x : 이미지가 삽입되는 좌측상단의 X 좌표
y : 이미지가 삽입되는 좌측상단의 Y 좌표
width : 이미지가 삽입되는 폭
height : 이미지가 삽입되는 높이
xlink:href : 삽입되는 이미지의 경로
<style>
*{margin: 30px; padding: 0;}
#exampleSub.bg{background:url(./img/line.jpg) 0 0 repeat;}
#exampleSub svg{width: 1000px; height: 250px;}
</style>

<div id="exampleSub" class="bg">
    <svg>
        <image x="100" y="5" width="204" height="189"  xlink:href="./img/coforwardQr2.png" />
    </svg>
</div>
*transform
[transform];
SVG 형태를 변경함
속성 값
translate([tx],[ty]) : 지정된 요소 좌표계를 수평 이동시킴
scale([sx,sy]) : 지정된 요소 좌표계의 스케일을 변경함
skewX([d]) : 지정된 요소 좌표계를 X축에 대해 기울임
skewY([d]) : 지정된 요소 좌표계를 Y축에 대해 기울임
rotate([d]) : 지정된 요소의 좌표계를 회전함
matrix([변환매트릭스]) : 변환매트릭스를 사용하여 좌표계특성을 변환함
<style>
*{margin: 30px; padding: 0;}
#exampleSub.bg{background:url(./img/line.jpg) 0 0 repeat;}
#exampleSub svg{width: 1000px; height: 250px;}

#orgImg{opacity:0.4;}
</style>

<div id="exampleSub" class="bg">
    <svg>
        <image id="orgImg" x="150" y="5" width="204" height="189" xlink:href="img/coforwardQr2.png" />
        <image x="150" y="5" width="204" height="189" xlink:href="img/coforwardQr2.png" transform="skewX(-30)  rotate(15)" />
    </svg>
</div>
linearGradient
<linearGradient x1="[x1]" y1="[y1]" x2="[x2]" y2="[y2]" spreadMethod="[체움방식]"gradientTransform="[변형방식]" >
선형그라디언트를 생성함
속성 값
x1 : 그라디언트적용 시점의 X축 비율
y1 : 그라디언트적용 시점의 Y축 비율
x2 : 그라디언트적용 종점의 X축 비율
y2 : 그라디언트적용 종점의 Y축 비율
체움방식 : 그라디언트의 체움방식 keyword pad, repeat, reflect
변형방식 : [transform]속성과 동일한 방법으로 그라디언트를 변형함
<stop offset="[offset]" stop-color="[color]" stop-opacity="[f]" />
색상변환점을 설정함
속성 값
offset : 그라디언트 내에서 색상 변환점 위치의 거리비율
color : 색상 변환점의 변환 색상
f : 변환점 영역의 투명도
<style>
*{margin: 30px; padding: 0;}
#exampleSub.bg{background:url(./img/line.jpg) 0 0 repeat;}
#exampleSub svg{width: 1000px; height: 250px;}

#exampleSub rect{stroke:#CCC; stroke-width:5;}
#exampleSub #rect01{fill:url(#lGradientSample01);}
#exampleSub #rect02{fill:url(#lGradientSample02);}
#exampleSub #rect03{fill:url(#lGradientSample03);}
#exampleSub text{font-size:15px; font-weight:bold;}
</style>

<div id="exampleSub" class="bg">
    <svg>
        <defs>
           <linearGradient id="lGradientSample01"
                       x1="0%" y1="0%"
                       x2="0%" y2="50%"
                       spreadMethod="pad"
                       gradientTransform="rotate(15)">
           <stop offset="0%" stop-color="#f00" stop-opacity="1"/>
           <stop offset="50%" stop-color="#0f0" stop-opacity="0.7"/>
           <stop offset="100%" stop-color="#00f" stop-opacity="0.5"/>
           </linearGradient>

           <linearGradient id="lGradientSample02"
                       x1="0%" y1="0%"
                       x2="0%" y2="50%"
                       spreadMethod="repeat">
           <stop offset="0%" stop-color="#f00" stop-opacity="1"/>
           <stop offset="50%" stop-color="#0f0" stop-opacity="0.7"/>
           <stop offset="100%" stop-color="#00f" stop-opacity="0.5"/>
           </linearGradient>

           <linearGradient id="lGradientSample03"
                       x1="0%" y1="0%"
                       x2="0%" y2="50%"
                       spreadMethod="reflect">
           <stop offset="0%" stop-color="#f00" stop-opacity="1"/>
           <stop offset="50%" stop-color="#0f0" stop-opacity="0.7"/>
           <stop offset="100%" stop-color="#00f" stop-opacity="0.5"/>
           </linearGradient>
        </defs>

        <rect id="rect01" x="40" y="20" width="100" height="150" rx="10" ry="10" />
        <text x="75" y="190">pad</text>
        <rect id="rect02" x="150" y="20" width="100" height="150" rx="10" ry="10" />
        <text x="180" y="190">repeat</text>
        <rect id="rect03" x="260" y="20" width="100" height="150" rx="10" ry="10" />
        <text x="290" y="190">reflect</text>
    </svg>
</div>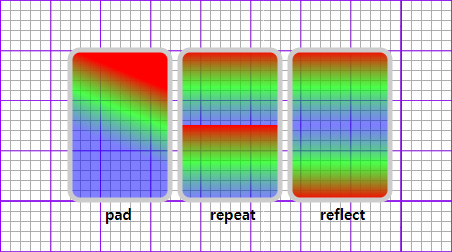
*radialGradient
<radialGradient cx="[cx]" cy="[cy]" fx="[fx]" fy="[fy]" r="[r]" spreadMethod="[체움방식]"gradientTransform="[변형방식]" />
선형그라디언트를 생성함
속성 값
cx : 원형 그라디언트 중점의 X축 비율
cy : 원형 그라디언트 중점의 Y축 비율
fx : 원형 그라디언트 초점의 X축 비율
fy : 원형 그라디언트 초점의 Y축 비율
r : 원형 그라디언트 반지름 비율
체움방식 : 그라디언트의 체움방식을 지정함 pad, repeat, reflect
변형방식 : [transform]속성과 동일한 방법으로 그라디언트를 변형함
<stop offset="[offset]" stop-color="[color]" stop-opacity="[f]" />
색상변환점을 설정함
속성 값
offset : 그라디언트 내에서 색상 변환점 위치의 거리비율
color : 색상 변환점의 변환 색상
f : 변환점의 투명도
<style>
*{margin: 30px; padding: 0;}
#exampleSub.bg{background:url(./img/line.jpg) 0 0 repeat;}
#exampleSub svg{width: 1000px; height: 250px;}

#rect01{stroke:#CCC; stroke-width:5; fill:url(#rGradientSample01);}
</style>

<div id="exampleSub" class="bg">
    <svg>
        <defs>
            <radialGradient id="rGradientSample01"
                cx="50%" cy="50%"
                fx="40%" fy="40%" r="30%"
                spreadMethod="reflect">
                <stop offset="0%"   stop-color="#F00" stop-opacity="1"/>
                <stop offset="50%"   stop-color="#0F0" stop-opacity="0.7"/>
                <stop offset="100%" stop-color="#00F" stop-opacity="0.5" />
            </radialGradient>
        </defs>
        <rect id="rect01" x="40" y="20" width="320" height="150" rx="10" ry="10" />
    </svg>
</div>
*fillter
<fillter >
필터효과의 적용
<style>
*{margin: 30px; padding: 0;}
#exampleSub.bg{background:url(./img/line.jpg) 0 0 repeat;}
#exampleSub svg{width: 1000px; height: 250px;}

#rect01{stroke:#CCC; stroke-width:5; fill:url(#rGradientSample01); filter:url(#blur);}
#shadowRect{fill:rgba(0,0,0,0.7); filter:url(#shadow);}
</style>

<div id="exampleSub" class="bg">
    <svg>
        <defs>
            <filter id="blur" >
                <feGaussianBlur stdDeviation="5" />
            </filter>
            <filter id="shadow" >
                <feGaussianBlur stdDeviation="15" />
                <feOffset dx="20" dy="20"/>
            </filter>
            <radialGradient id="rGradientSample01"
                cx="50%" cy="50%"
                fx="40%" fy="40%" r="30%"
                spreadMethod="reflect">
                <stop offset="0%"   stop-color="#F00" stop-opacity="1"/>
                <stop offset="50%"   stop-color="#0F0" stop-opacity="0.7"/>
                <stop offset="100%" stop-color="#00F" stop-opacity="0.5" />
            </radialGradient>
        </defs>
        <rect id="shadowRect" x="40" y="20" width="320" height="150" rx="10" ry="10" />
        <rect id="rect01" x="40" y="20" width="320" height="150" rx="10" ry="10" />
    </svg>
</div>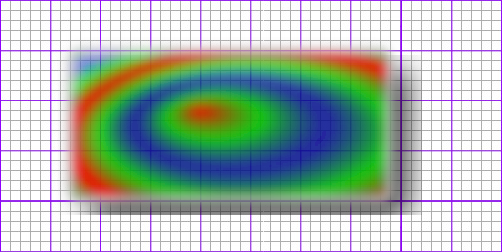
*g
<g>
SVG요소의 그룹핑
<style>
*{margin: 30px; padding: 0;}
#exampleSub.bg{background:url(./img/line.jpg) 0 0 repeat;}
#exampleSub svg{width: 1000px; height: 250px;}

#groupTest{stroke:#CCC; stroke-width:5; fill:url(#rGradientSample01);}
</style>

<div id="exampleSub" class="bg">
    <svg>
        <defs>
            <radialGradient id="rGradientSample01"
                cx="50%" cy="50%"
                fx="40%" fy="40%" r="30%"
                spreadMethod="reflect">
                <stop offset="0%"   stop-color="#F00" stop-opacity="1"/>
                <stop offset="50%"   stop-color="#0F0" stop-opacity="0.7"/>
                <stop offset="100%" stop-color="#00F" stop-opacity="0.5" />
            </radialGradient>
        </defs>
        <g id="groupTest" transform="skewX(-30)">
        <rect x="110" y="40" width="120" height="120" rx="10" ry="10" />
        <circle cx="350" cy="100" r="60" />
        </g>
    </svg>
</div>
*animateTransform
<animateTransform>
SVG요소의 에니메이션
<style>
*{margin: 30px; padding: 0;}
#exampleSub.bg{background:url(./img/line.jpg) 0 0 repeat;}
#exampleSub svg{width: 1000px; height: 250px;}

#rect01{fill:url(#rGradientSample01);}
</style>

<div id="exampleSub" class="bg">
    <svg>
        <defs>
            <radialGradient id="rGradientSample01"
            cx="50%" cy="50%"
            fx="40%" fy="40%" r="30%"
            spreadMethod="reflect"
            gradientTransform="skewX(15)">
                <stop offset="0%"   stop-color="#F00" stop-opacity="1"/>
                <stop offset="50%"   stop-color="#0F0" stop-opacity="0.7"/>
                <stop offset="100%" stop-color="#00F" stop-opacity="0.5" />
            </radialGradient>
        </defs>
        <rect id="rect01" x="0" y="0" width="400" height="200">
            <animateTransform
                attributeName="transform"
                begin="0s"
                dur="10s"
                type="rotate"
                from="0 60 60"
                to="360 60 60"
                repeatCount="indefinite"
            />
        </rect>
        <image x="115" y="80" width="178" height="31" xlink:href="img/coforwardText.png" />
    <svg>
</div>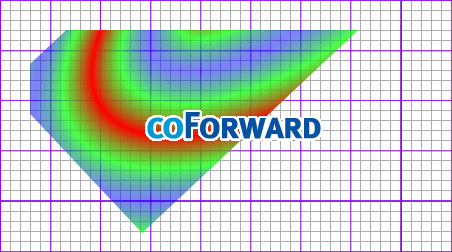
SVG Editor
http://svg-edit.googlecode.com/svn/branches/2.5.1/editor/svg-editor.html
*inkscape http://inkscape.org/
Sketsa SVG Editor
http://www.kiyut.com/products/sketsa/index.html
*SVGDeveloper
데모사이트
*http://raphaeljs.com/
*http://www.html5canvastutorials.com/

SVG코드로 코드를 복사하거나 저장하여 사용
<!-- SVG CODE -->
<svg version="1.1" id="레이어_1" xmlns="http://www.w3.org/2000/svg" xmlns:xlink="http://www.w3.org/1999/xlink" x="0px"
y="0px" width="196.955px" height="187.316px" viewBox="0 0 196.955 187.316" enable-background="new 0 0 196.955 187.316"
xml:space="preserve">
    <polygon fill="#E60012" stroke="#172A88" stroke-width="3" stroke-miterlimit="10" points="98.478,3.39 127.913,63.032
    193.731,72.596 146.104,119.021 157.348,184.574 98.478,153.624 39.607,184.574 50.851,119.021 3.224,72.596 69.042,63.032 "/>
</svg>

<!-- object -->
<object data="./images/star.svg" type=""></object>

<!-- img -->
<img src="./images/star.svg" alt="">
'STUDY > JavaScript' 카테고리의 다른 글
| 숫자 천 단위마다 콤마(,) 찍기 (0) | 2021.12.17 |
|---|---|
| jQuery node(DOM) 선택자 (0) | 2021.12.08 |
| JavaScript event (0) | 2021.12.03 |
| setInterval, setTimeout, 현재시간표시 (0) | 2021.12.03 |
| JavaScript 문서 객체 조작 (0) | 2021.12.03 |


